Hello!
So, if you’re anything like me, chances are you’ve played with Netlify’s Split Testing features plenty. It’s great being able to A/B test different branches to see how your users react to different features!
That being said, sometimes you want to add more granular control than an entire branch. We use LaunchDarkly internally for some of our own features, and I thought it’d be interesting to build a basic React app to try it out as well!
Initializing a React app with LaunchDarkly
So, first of all you need a React app to get started. If you want you can use an existing one, but in case you don’t have one handy, you can make one with either create-react-app or Vite:
# create-react-app$ npx create-react-app new-app
# Vite$ npm init @vitejs/app new-app
Once you cd into your new app directory, install the LaunchDarkly React SDK like so:
npm install --save launchdarkly-react-client-sdkNow you’re all installed! We’ll add more to our code in a bit. Go ahead and commit this to git and deploy it to Netlify now, if you’d like!
Creating a feature flag
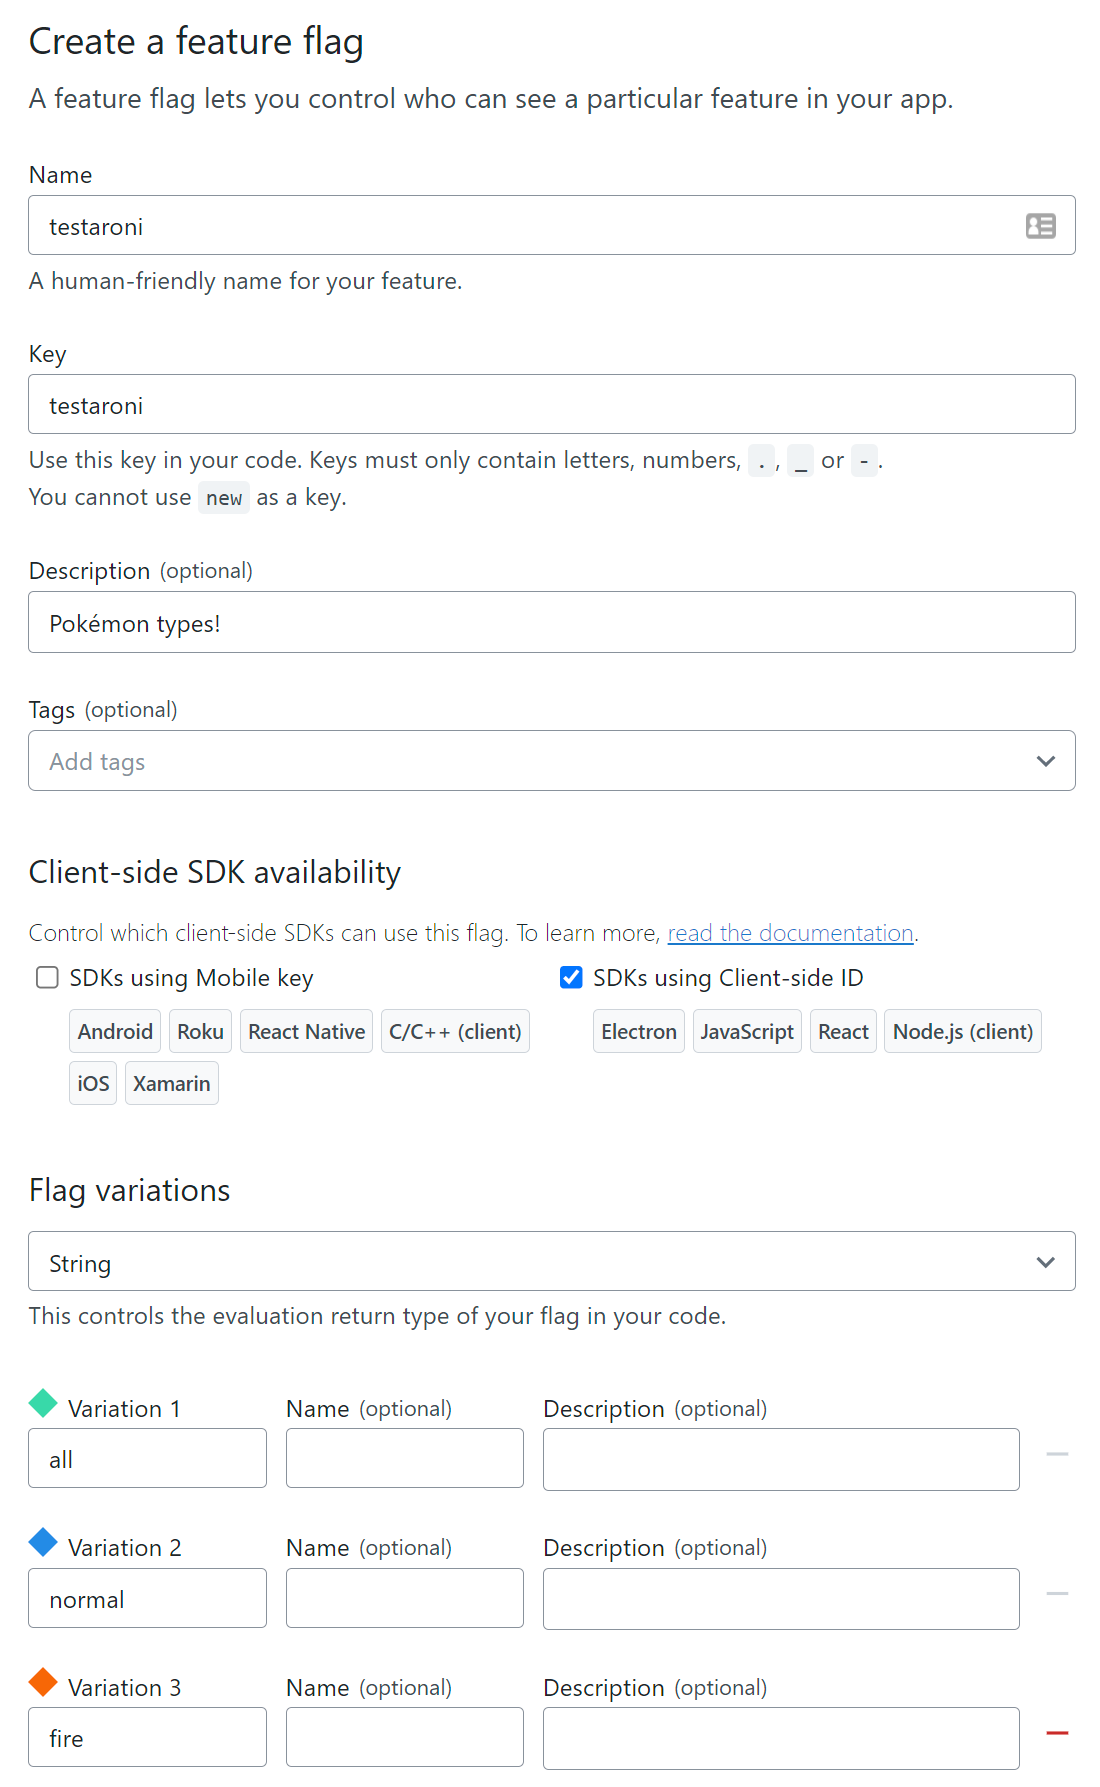
First off, you need to sign up for LaunchDarkly. Once you’re all set, you can go straight to the “Feature Flags” tab and make a new Flag. I’m going to call mine testaroni, but you can call it whatever you’d like.
Because we’re using React, make sure you check “SDKs using Client-side ID”! Now for Flag variations, you can keep it as Boolean, but they also allow you to do a string, number, or JSON. I chose a String for some different Pokémon types.
Your Flag should generally look like this before you create it:

Woo hoo! You don’t have to toggle that on just yet.
Adding your feature flag to your React app
Head over to your Account Settings and go to Projects to find your Client-side ID. Copy that, and then in the root of your React app, make a .env.local file, like so:
# create-react-appREACT_APP_LC_CLIENT_KEY=your_key
# ViteVITE_LD_CLIENT_KEY=your_key
(If you added your repo to Netlify already, you can use the CLI or go to the Netlify UI to add your environment variables now, or do it later when you’re ready to test things out)
Now, let’s implement the LaunchDarkly React SDK into your app. The SDK uses the React Context API to share your data across the rest of your application (side note, if you’d like to see how Context can share state across an application separately from this, here’s a post that explains how to use it in Next.js).
You can use the SDK as either a component wrapper, or a higher order component. I chose to go the HOC route to keep my components fairly clean, but you can go either way!
In your code, whether it’s a brand new project or an existing one, find a component that wraps what you want to have access to your feature flags. This could be your App.jsx at the very top level, or this could be just one section of your app (like a container component).
You’ll want to import withLDProvider from the SDK, and then bring in your Client-side ID that you got earlier (with create-react-app, it’ll be process.env.REACT_APP_LC_CLIENT_KEY, with Vite it will be import.meta.env.VITE_LD_CLIENT_KEY). The LaunchDarkly Provider requires a user, and this key. Here’s what it’ll look like:
import React from "react";import { withLDProvider } from "launchdarkly-react-client-sdk";
function App() {  return (    <>      {/* whatever components you're wrapping */}    </>  );}
export default withLDProvider({  clientSideID: import.meta.env.VITE_LD_CLIENT_KEY,  user: {    key: "user_key",    name: "User Name",    email: "user@email.com",  },})(App);
So to clarify, this App.jsx file wraps up the rest of my application, and anything below it in my application’s “tree” will have access to the values in the provider!
The user here is hard coded. When a user navigates to this point in your application, they will be saved as “User Name” (and all their details) in your LaunchDarkly dashboard. If you have an application already set up with authentication or some other variables, you can pass those in programmatically instead for your data reporting.
Okay, now we need to consume it. Take a component (I’ll make one called Pokemon.jsx) and import the LaunchDarkly Consumer:
import { withLDConsumer } from 'launchdarkly-react-client-sdk';
const Pokemon = ({ flags }) => {    return <>{/* ... */}</>};
export default withLDConsumer()(Pokemon);
This is very similar to the Provider, in that we wrap the HOC around the component name in the export! Notice how my component takes in flags as a prop. It automatically gets this when wrapped with the withLDConsumer HOC! Your flag that you made earlier can now be used in your component. For example:
const Pokemon = ({ flags }) => { return <div>My favorite type is {flags.testeroni}</div>};Imagine doing a switch statement on this, or using a Boolean type of flag to toggle things! The possibilities are endless.
Environments
Now, the flag I made in this example is a Production flag (you can switch environments in the LaunchDarkly dashboard). This means that I can only see if it works when my application is in production mode. I ran into this as an issue while debugging, when I realized you need to make different flags in different environments to make it work when testing or when pushing live. Make sure you don’t make the same mistakes I did!
That’s it?
That’s it! There’s a lot you can do with LaunchDarkly, and deploying it to Netlify is simply a git push away. If you’d like to see how I built with it, here’s a more fleshed-out version of my Pokémon app! In it, you can search for different Pokémon, but if a certain feature flag is set, it restricts the types you can search for (like normal type, fire type, or electric type).
Here’s the repo with the source code, and if you’d like to take it and run with it, you can go ahead and deploy it yourself:
Clicking this will clone the repo to your chosen git provider, and automatically deploy it to Netlify. Don’t forget your environment variables!
Til next time!


